IMPORTANT NOTICE
Starting January 1, 2026, Shopify is officially changing its rules for application management. The old method of creating “Private Apps” directly within the store admin will be deprecated. All new connections and updates to existing integrations must now be performed via the Shopify Dev Platform.
Authorization
1.1. Log in to the official Shopify Developer Dashboard: https://dev.shopify.com/dashboard
Accessing the App Creation Menu
2.1. Once logged in to the dashboard:
Select the Apps section from the left-hand sidebar.
In the top right corner, click the Create app button.

Choosing the Creation Method and Naming
3.1. On the selection screen:
Choose the second option on the right — Start from Dev Dashboard.
This method allows you to generate API credentials quickly without using a command-line interface.In the App name field, enter a descriptive name (e.g., Fozzels_APP).
Click the Create button.

Version Configuration and Mandatory Settings
4.1. After clicking Create, you will be redirected to the Create a version page.

4.2. Name & App URL
Enter App's name
Enter your store’s URL (e.g., https://your-store-name.myshopify.com).
4.3. Mandatory setting
Embed app in Shopify admin: must be enabled.
This ensures the Fozzels interface appears inside your Shopify admin panel.
Configuring API Access (Scopes)
5.1. Scroll down to the Access section to define what data Fozzels can manage.
5.2. In the Scopes block:
Click the Select scopes link in the top right corner.

Selecting Permissions
6.1. In the Select scopes modal window:
Use the search bar to find specific permissions.

6.2. Required permissions
This list is mandatory for all store types, including stores using Shopify Markets and Language Pages.Products: read_product_listings, read_products, write_products, read_product_feeds.
Metadata: read_metaobject_definitions, read_metaobjects.
Translations: read_translations, write_translations.
Locales: read_locales.
Markets: read_markets, write_markets.
6.3. Click Done once all required scopes are selected.
7. Pre-Release Checklist: App ConfigurationBefore clicking the Release button, verify the following:
App URL: a valid store URL is entered (e.g., https://store-name.myshopify.com).
API Version: the Webhooks API Version is set to the latest stable release (e.g., 2025-10).
Embedded Interface: “Embed app in Shopify admin” is enabled (required for Fozzels).
Mandatory Scopes: all required permissions are present:
Products: read_product_listings, read_products, write_products, read_product_feeds
Metadata: read_metaobject_definitions, read_metaobjects
Translations: read_translations, write_translations
Locales: read_locales
Markets: read_markets, write_markets
Scope Verification: all permissions include the required read and write access where applicable.

8. Releasing the Version
8.1. To activate the configuration:
Locate the Release button in the top right corner of the Create a version page.
Click Release.

8.2. In the pop-up window:
Version name (optional): e.g., v1.
If left empty, Shopify will auto-generate a name.Version message (optional): e.g., “Initial setup for Fozzels”.
8.3. Click the Release button in the bottom right corner to finalize.
The version status will change to Active.


Retrieving API Credentials
9.1. In the Shopify Dev Dashboard, go to Settings in the left-hand sidebar.
9.2. In the App credentials (API keys) section, copy the following:
Client ID (API Key)
Client Secret (API Secret Key)

Launching the Installation
10.1. After release, GO to the app Home tab.
10.2. Make sure you are on the Home tab.
10.3. In the left-hand sidebar, open the Distribution tab.
10.4. Click Select distribution method and choose Custom Distribution.


10.6. After authorization, you will return to the Custom Distribution page.
Enter your store domain (e.g., your-store.myshopify.com).
Click Generate link.
Confirm the action in the pop-up window.
10.7. You will be redirected to the Install app page in your store admin.
Click Install.
Confirm the message “This app is exclusive to your store”.


10.8. To complete the synchronization, return to your Fozzels account to enter the credentials and finalize the connection.
Create Integration in Fozzels.
11.1. Connection Setup
Log in to your Fozzels account: https://app.fozzels.com
Go to the Integration section.
Click New Integration.
Choose Shopify as the platform.
Enter the name of the integration.
Enter the Shopify webstore URL.
Note:
For the URL and App Host Name fields, always use the .myshopify.com domain, not the public store URL.
Example: teststore.myshopify.com

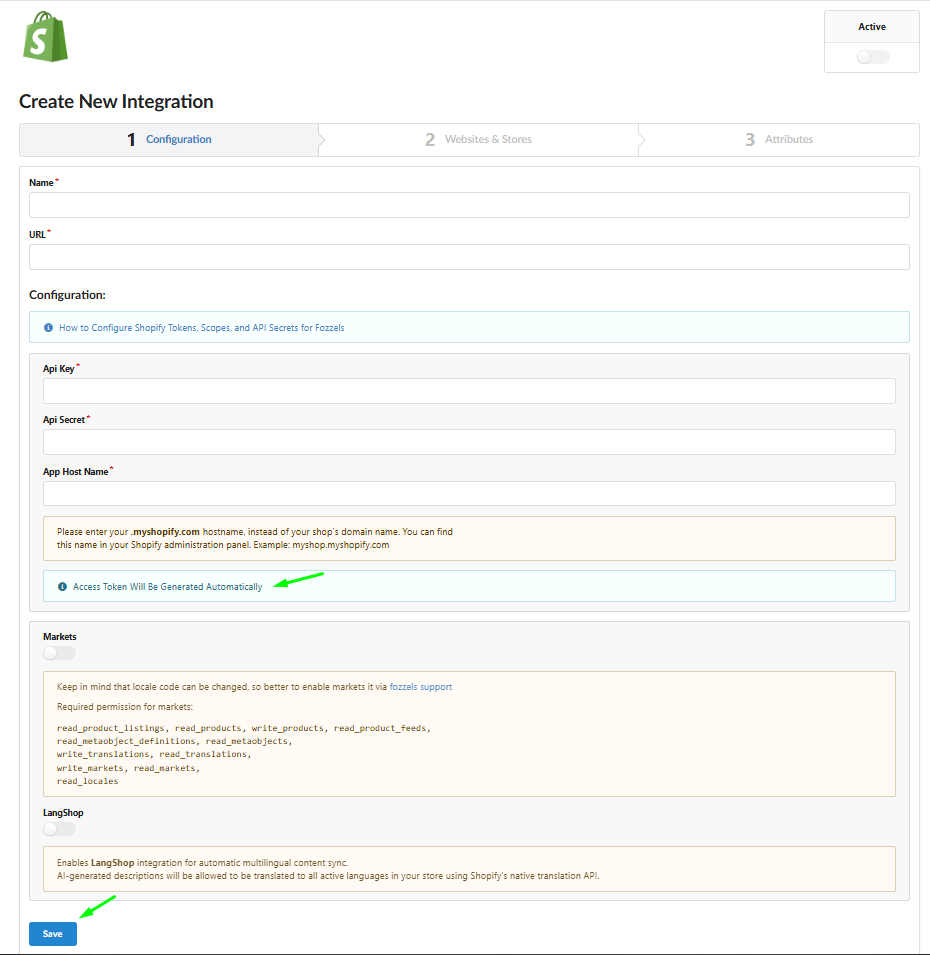
Enter API Credentials in Fozzels
12.1. Copy and paste the credentials into Fozzels:
API Key → API key field
API Secret Key → API Secret field
App Host Name → App Host Name field
Additional settings and Access Token Generation
13.1. The Access Token field will be available after it's generation.
13.2. Enable the Markets or LangShop toggles if you need to synchronize content across multiple markets or languages.
13.3. Click the Save button.
13.4 Move to Websites & Stores tab.
13.5 Activate your integration.
13.6 Click the Pull Websites & Stores button to get them.
13.3. The system will automatically generate the Access Token after successful authorization.
14. Activation and Synchronization
14.1. Activate Websites and Languages using toggles. The default language is marked with a star.
14.2. Click Pull Products to start importing products and attributes. Progress will be shown in the progress bar.
14.3. Go to the Attributes tab to view, enable, disable, or edit imported attributes. Read more about managing the attributes here .
After successfully creating the integration, you can start building flows and generate your first content !
Was this article helpful?
That’s Great!
Thank you for your feedback
Sorry! We couldn't be helpful
Thank you for your feedback
Feedback sent
We appreciate your effort and will try to fix the article
